Tuesday, May 29, 2012

What I made Tuesday

Well, I don't know about you, but I had a very wonderful holiday weekend. Got to spend some time with the family watching some movies and doing some beading. Also got to work on a couple of resin projects that have been hovering in the back of my mind.

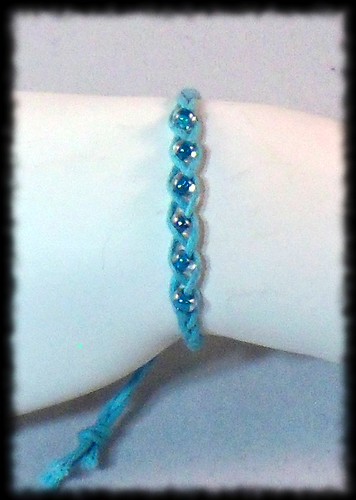
Beading first I think. Last week I posted a pattern and some pics of my "Diamond" Ring, and I mentioned that I thought this design would be fun in some gem colors. Well, it is!

Variations on my "diamond" ring pattern

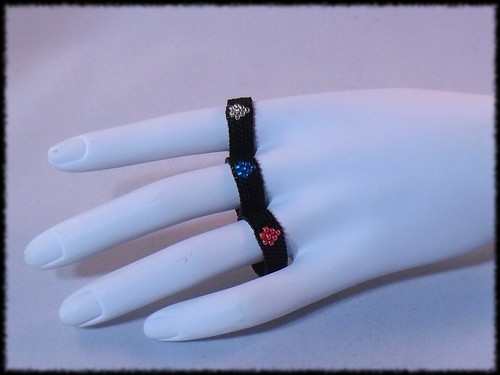
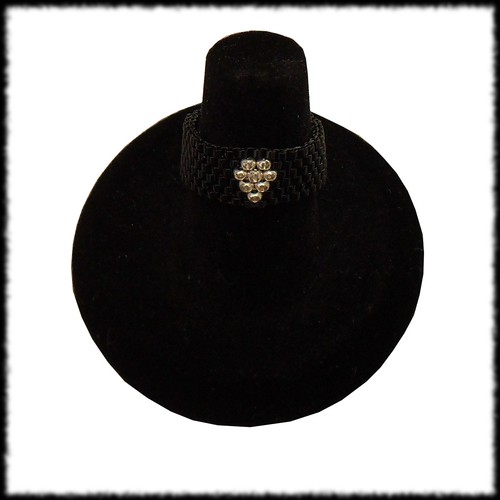
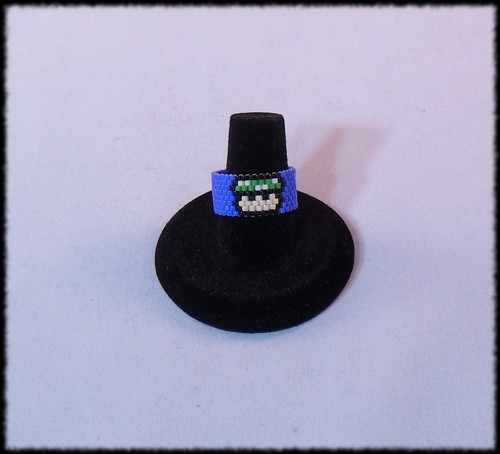
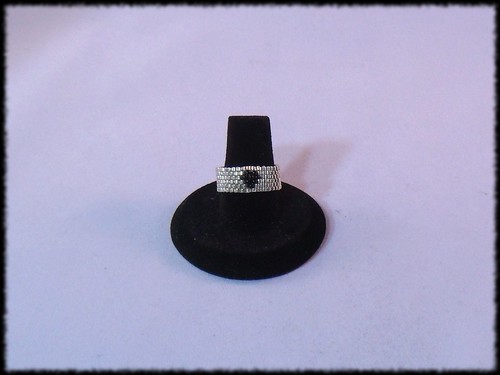
Here you can see the original with a silver "diamond" as well as two variations. One red, one blue. Hmmmm, just realized that all together, these are red, white, and blue.... Below, you will see my favorite variation of this pattern. I switched the original, so now you have a silver band and a black "diamond"! I love how striking this one turned out. Definitely an attention getter!

Black Diamond ring variation

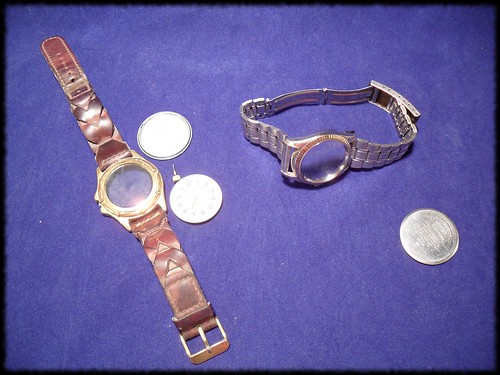
On the resin front - when a co-worker found out I was into steampunk/gears she gave me a bag of old/non-working watches to take apart. As it turns out, none of them were old enough to actually have any metal gears inside, but some of them had really great bands/bezels. So, I decided that they would be cool to use with resin. My experiments this weekend were flawed, but I have lots more watches to play with!
Here are the watches before. The one with the leather band reminded me of a boat's porthole. The metal band seemed kind of 1970's futuristic.

the watches before the resin

The leather band watch became a porthole to an undersea world, with a lovely sticker fish. I think if I try to recreate this, I will go with more realistic stickers. Maybe even see if I can cut pictures from National Geographic or something. This turned out just a little more cartoony than my original vision.

Under the Sea - resin in an old watch

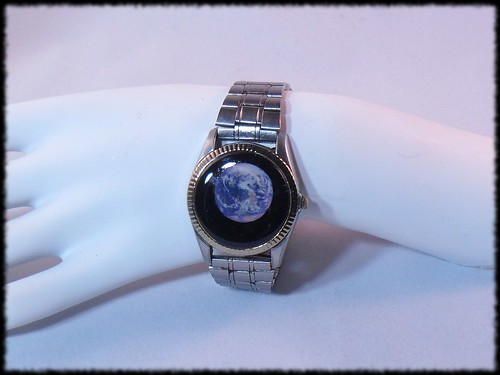
For my futuristic band, I was so mad at this. I had some great planet stickers, and got the Earth in nicely. But, when putting in my sparkly black background, I got an air bubble. It was hiding behind the Earth, so I didn't see it. However, as the piece set curing, it moved and became visible just to the upper left of the planet. Grrrr.... However, I did find that if your watch bezel has scratches, you can paint a thin layer of resin on top and the scratches vanish! I will be redoing this one in another watch for sure!

The Earth - resin in an old watch

Finally, with the leftover resin, I tinted it with some oil paints, added some pearlex in micropearl to make it sparkly and then poured it into star and heart molds. With July Fourth coming, these will be perfect! (They are much more sparkly in person, my lighting just sucks. This is what I get for taking pictures at 6 AM!)

glittery resin stars and hearts
Pin It!

Wednesday, May 23, 2012

New Ring Pattern: Diamond Ring

ring_diamond_pattern Today I bring you a pattern to make your own "Diamond" ring! This simple pattern works up really quickly but is a lot of fun to wear. I created mine using black Delicas and silver rocailles, but I am totally seeing this in every gem tone I can find!

My "diamond" ring

If you look closely, you will see that the silver has worn off the front of my diamond already, even though this ring is only a week old. However, because the back is pulled away from my finger it still has its silver. I got lucky as this actually produces a cool effect sort of like a silver backed crystal. I will preserve this by using a dab of clear fingernail polish on the back of the diamond. However, when I make this for sale I will be sure to use the Duracoat beads!

closeup
Quote: Sometimes glass glitters more than diamonds because it has more to prove.
---Terry Pratchett
Pin It!

Monday, May 21, 2012

What I Made Monday

So, I haven't made anything recently that I am willing to show yet, but one of my rings was featured over at Geek Crafts! Woo Linkage!

Did I mention I sold this necklace a couple of weeks ago? My first real jewelry sale on Etsy! (by real I mean not to someone I know and not a pattern)

SAM_0687

Life is good. Enjoy it.
Pin It!

Monday, May 14, 2012

What I Made Monday

Ok, getting back on track this week. This weekend I made three rings, and came up with a great way to double my beading space!

Rings first, I think. For my niece, I made a Guardian Angel ring. You may recognize the pattern from when I posted it back around Christmas. I had made one before, but it had been a while. There are some minor flaws in this one when the brick stitch was added (for some reason I forgot the trick of starting a row with two beads to hide the thread... no idea where my mind was...), but my niece was THRILLED! One of the great things about this ring, is that it is so easy to change the colors of hair/skin/dress to personalize it for the recipient.

Guardian Angel Ring

Next we have a Super Mario Brothers 1 Up Mushroom ring. This one will be for my personal wearing only, as I am pretty sure this mushroom is covered by either copyright or trade marks... or both! But, some days you just need an extra life!

1 Up Mushroom Ring

Time to admit the truth. I do not always bead up a ring before I post the pattern. Sometimes, it is days, weeks, even months later that I finally get around to making one. There are a couple I have never made, either because I don't have beads in the color I want, or because I just got distracted. Sad but true. This weekend I did bead up the butterfly ring that was posted earlier this spring. I love the way it turned out.

butterfly ring

And finally, how I doubled my beading space... First let me explain that I bead mostly on a small table in front of a recliner. If I need to have my laptop open while beading (to see a pattern or to watch Netflix) the table can get very crowded, and the safety of the laptop is a little iffy. On Friday, I made a run to the Habitat Re-Store (Habitat for Humanity Resale Store - if you haven't been to one in your area definately go!) to get a tile for baking polymer clay on. Since the Re-Store I go to is in a college town, it tends to have a lot of office stuff in it - desks, chairs, file cabinets - in on Friday it had an old monitor stand/keyboard tray. This thing is made out of really heavy steel - to hold the old giant monitors! And it was only $3! So I grabbed it and brought it home. I cleared off my table, added the monitor stand/keyboard tray and suddenly I can bead and have my laptop open! YAY!

SAM_1715

SAM_1714

As stated before, this thing is heavy, so there is no risk of it tipping when I have the tray out. And, it gets the beading a little closer to me, so I no longer require a giant pillow in the chair to support my back while beading! Did I mention yay? 'Cause - YAY!
Pin It!

Thursday, May 10, 2012

What I Made.... Thursday

So, it was a busy weekend with 2 viewings of Avengers - which is AWESOME! - and then a busy start to my work week, so my "What I Made" post is a little late this week. However, it is packed full of stuff to make up for it!

Up first, after seeing some of these online, the small person and I made our own Monster Picture from a thrift store landscape! She designed her monsters on note paper, her father sketched them into the painting, and then she and I painted them in with acrylic paints. Lots of fun!

Monster's Day Out

Next, I was inspired by this post to make some macrame bracelets. The tutorial says to use gold or silver rings, but, come on? really? with macrame? This is cotton or hemp cord, it doesn't really last all that long. So, mine have some base metal bits, and a hexagon I made with seed beads. There is also one where I just did some simple braiding with beads. All of them were fairly simple to make. The site above has instructions, but I already knew how, so I may have strayed from their method.

Braded Bracelet with Beads

Macrame bracelet with Ring Focal

Macrame Bracelet with Gear Focal

Macrame Bracelet with Beadwoven Focal

Macrame Bracelets

These are a great way to get the stack bracelet look that seems to be so popular right now. I just wear one at a time, cause I'm not cool like that. I do love the light, summery feel of them!
Pin It!

Thursday, May 3, 2012

New Ring Pattern: Thor

I can't believe I almost forgot to post the pattern for Thor! What was I thinking!

ring_thor
Pin It!

New Ring Patterns: Black Widow and Nick Fury

Ok, I am posting my final two patterns today, cause I don't plan to blog tomorrow. So, I bring you my Black Widow and Nick Fury inspired rings. These were both really hard. I didn't want to just do the spider for Black Widow, as it was a little obvious, however, nothing else really worked on the small space of a ring. For Nick Fury, you really only have two choices: and eye patch or a gun. Since an eye patch wouldn't work at all on a ring, I went with the gun.

ring_black_widow

ring_nick_fury

And thus is my Avenger Ring Set concluded. Hope everyone can get out and see the movie this weekend. It actually looks like I will be seeing it twice: once tomorrow to make sure it is ok for an 8 yr old to watch, and then again on Saturday with the 8 yr old in question! WHEEEEEEE!!!!!
Pin It!

Wednesday, May 2, 2012

New Ring Pattern: Avengers Hawkeye

ring_hawkeye

While watching Thor in theaters, I nearly scared my niece half to death when I suddenly started squeeling (quietly, cause it was a theater) "That's Hawkeye!". I was actually quite surprised that I knew who it was, since in Thor they only referred to him as "Barton". The fact that I noticed he was using a bow, and that I remembered Clint Barton was Hawkeye was quite startling! I blame Matthew.

Pin It!

Tuesday, May 1, 2012

New Ring Pattern: The Incredible Hulk

ring_hulk_fist

Today's ring pattern is inspired by the Incredible Hulk. The Hulk is most frequently portrayed in comics as either, a giant angry smash monster, or as a childlike behemoth who likes to buy beans. My personal favorite portrayal of the Hulk, is from a story that never took place. Marvel Fanfare was a comic from the 70's and 80's that printed the extra stories from several books that got overtaken by continuity. These were stories they had ready to publish in case a deadline wasn't met, but that never actually got published, and that no longer made sense in the ongoing continuity of the original series. So, the published them in Fanfare.

Marvel Fanfare #29 featured the Hulk. The great thing about this story was that every page was a single panel splash page. The Hulk as he was meant to be, filling each page with a single image! I loved that in this story it was a very calm and contemplative Hulk. No "Hulk SMASH!". No "Hulk wants pants!". A very different story indeed.

Did you know that the Hulk was originally gray? It was a coloring issue that made him green - gray was hard to do with the printing technology of the time. Green was easier.
Pin It!
Related Posts Plugin for WordPress, Blogger...